Find Us ![]()
![]()
![]()
![]()
![]()
![]()
New Arrival on sale, 50% discount ! Take it home today ! http://www.amazon.co.uk/dp/B01422DQTS
OVERVIEW
CCTV Camera Systems are getting more prevalent in our everyday life with growing concern pertains to private property safety measure. How each person or business entity choose their video surveillance system varies based on their own personal needs and financial budget. However, one common issue that most ones encounter would be the installation process of the entire system, which cable goes where, how to distinguish one interface from the other, and etc. Don’t worry, we are here now, How to Install CCTV Camera Kits in 5 Steps, the kit that we’re using as a demonstration example is the Floureon AHD DVR CCTV Camera System.
Step 1 – Understand what comes with the box
The first thing, comprehend the product itself as possible as you can. Many of you made an informed decision before you invest in a CCTV DVR Kit. If you follow the steps and utilize the tips that listed here, you’ll eventually find out – it’s not that hard to install a whole system.
Here are a couple of tips to get you started to DIY your first CCTV Camera System!
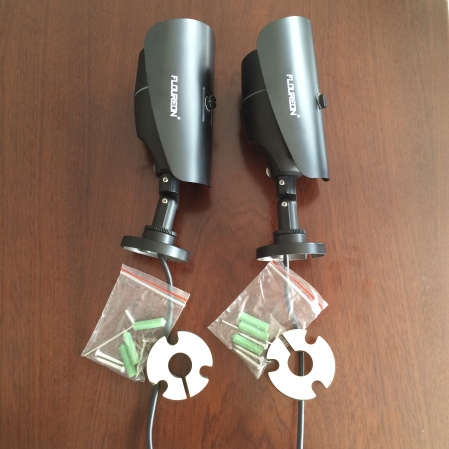
#1 Tip: Unbox and take out all contents in the package and figure out what each part is or if anything is not included based on the user manual.
#2 Tip: Lay everything in the box on a flat surface. The initial visual presentation to a complex product kit would help you familiarize product contents prior to your product installation.
#3 Tip: Sort similar items next to each other for further familiarization and easy grab. For instance, this kit comes with four analog high definition cameras, each camera requires cables to connect to a power source as well as the DVR. Can placed cameras and cables together, and it proved to be more convenient once you start hooking up power and cables.
Now, you are ready to move on to the next step.
Step 2 – Connect your DVR to Power, USB Mouse & Monitor
After obtaining a better understanding of each part of the system, you are now officially moving on to step 2. Next we’re going to show you how to connect your DVR to power, USB mouse and monitor.
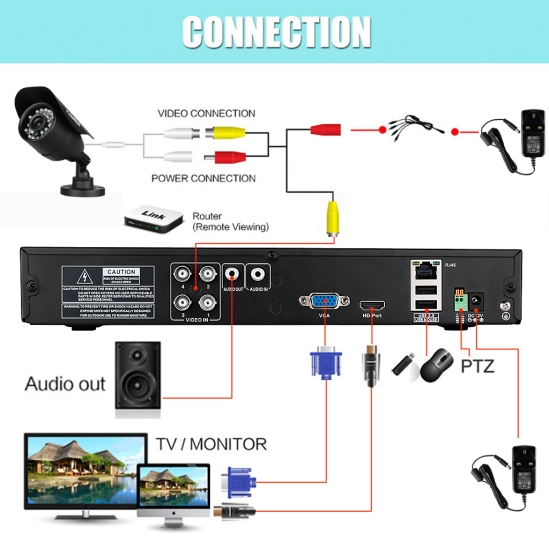
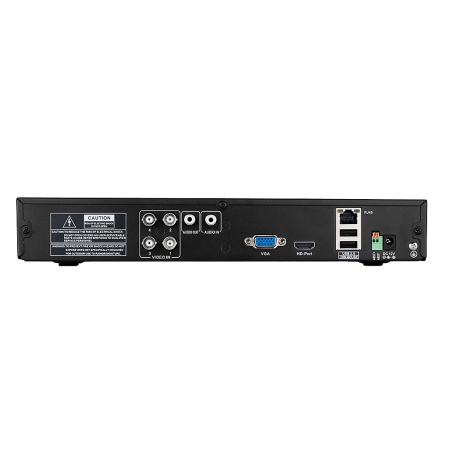
First, use the power cable and connect one side to the DC-12V interface on the back of your DVR, the other straight to a power source. You’ll notice the signal light next to the Ethernet interface lit up right away!
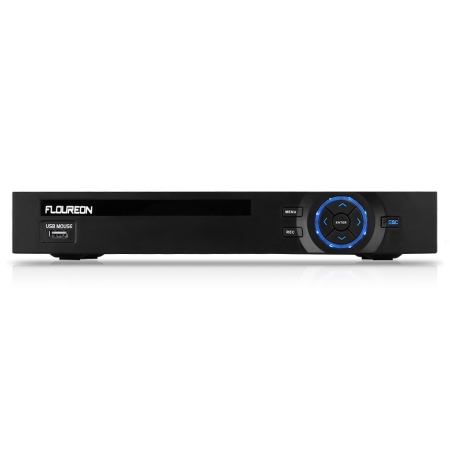
Second, simply plug in the USB mouse to any of the USB interface to use it as a control tool for monitors. This Floureon AHD DVR has two USB 2.0 interface in the back and one in the front so it supports monitor control, USB backup as well as wireless network card in total three working simultaneously.
Third, depending on the choice of your monitor, you can use the VGA interface or the HDMI interface. The VGA connector is a three-row 15-pin DE-15 connector which is commonly found on many video cards, computer monitors, and high definition television sets. The HDMI interface, on the other hand, supports standard, enhanced, or high-definition video, plus multichannel digital audio on a single cable.
Step 3 – Connect your Cameras to the DVR and Power Source
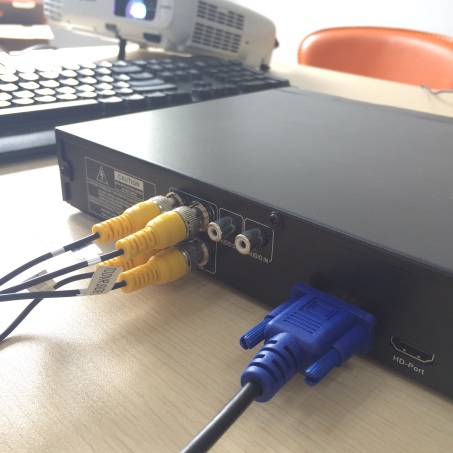
When you proceed to this step, you will find out all video input and output interface adopt the BNC interface and the coaxial cable use the BNC connector rather than the commonly-seen RCA connections. If you want to buy additional cameras, have to make sure it supports BNC or purchase a RCA-to-BNC adaptor.

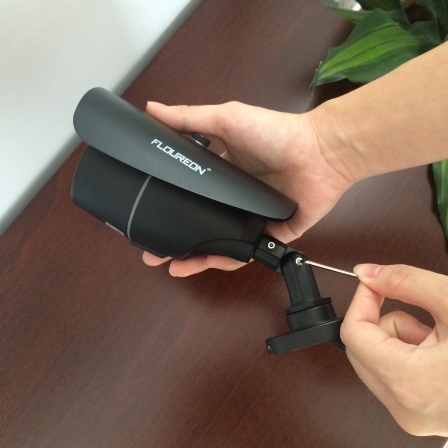
If you look closely on the first picture, you’ll see each side of the coax cable has a clear indication of which side goes where. Follow the labels and connect. Repeat the same process until four cameras are fully installed using the coax cable and power splitter cable.
Step 4 – Camera Testing
You can move on to the testing phase followed by mounting your camera to the wall or ceiling to complete your home video surveillance solution. Yet before that, let’s talk about some camera testing and additional tips.
First by tightening up your camera and adjust viewing angle if needed. If your cameras come adjusted, please move on to the next paragraph. I noticed that my cameras came in loose form and my package came with an Allen key to fine tune the camera angle. If your CCTV Camera System doesn’t come with it, I’m sure you can find one in your home tool box or just get it in a nearby hardware store. Or check your IKEA tools, they love that stuff.
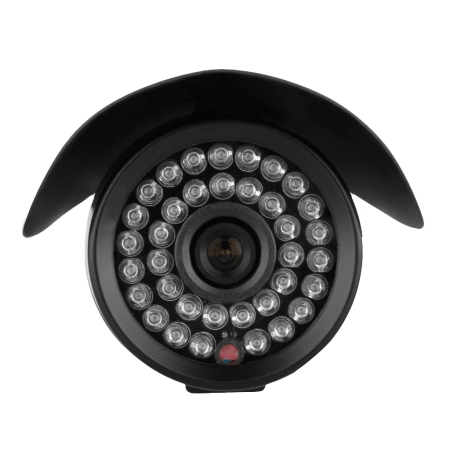
I chose the kit with bullet cameras and so far everything looks up to their claim, that the casing and infrared LEDs are accurate to what the vendor describes. If you wish to test out your CCTV cameras before actual use, I suggest that you leave it connected for at least 24 hours. This way, you can see how the video images switch from color to night time monochrome hues. At night, the image quality might appear sharper than in the morning. Therefore, when you leave your house at night, you can turn off a couple of lights so the night function kicks in and ensure a better video quality at night.
Tips:
#1 – when you finish mounting your cameras to the ceiling or wall yet discovering signal transmission failures, you can use a CCTV testing monitor and detect individual camera for troubleshooting.
Step 5 – DVR Testing

VOILA! Congratulations, your CCTV DVR Kit is fully installed now! You can finish your testing by taking into account matters like: is the network setup program easy to navigate? How do I set up remote access? How to change setting of automatic motion detection? How to setup your email account for email alert? Your should be able to locate relevant information in your user manual thus I won’t get into the specific details.
Conclusion
DIY your own CCTV Camera System is not nearly as complex as some of articles stated online. You’ll feel so accomplished when you set up the whole system all by yourself in just a few minutes.
Related Post:
How to choose a suitable security kit ?
[Video Review] Floureon® 40W 5 Port USB Charger Family Sized Desktop Charger With Power Cord

Bonjour j ‘ai acheté sur le site amazon un nvr FLOUREON 8 Voies 960H.
pouvez vous me dire comment le configurer en enregistrement sur disc dur uniquement sur détection.
je voudrais aussi savoir quelle application android je dois télécharger pour que cela fonctionne sur mon mobile?
赞赞
1.Enter the Main Menu – Record – Record Conf interface and recording mode set up to Detect.
2.Set up motion detect Enable.
赞赞
do I have to connect the camera recorder to a pc for it to record and if so where can I find the details on how to do this. our cameras are all set up but we don’t know how to record. I thought a cd. was required but can’t see anywhere for one to be inserted.
赞赞
How to install General CMS for remoting H.264 Camera DVR on PC
赞赞
i can’t monitor my cameras on my cell phone when i am a way from home
赞赞
How to remote access DVR via mobile phone please refer to the steps
1.DVR connect to router via Ethernet cable
2.Enter the Network setting of DVR to set DHCP Enable and DNS set up to Primary DNS: 8.8.8.8 / Secondary DNS :8.8.4.4
3.Check whether DVR connect to Internet success.If the Nat status is Connected mean that DVR connect to Internet success.
4.Phone connect to the Internet, download and install APP XMeye, then open the APP, click Add Device, enter the DVR device code and password.
Note: APP need to register account, if you can not complete the registration, please select the local login mode.
赞赞
I need one-on-one help cuz the email system is not working for me to get the products set up thank you Alan
赞赞
How to set up alarm email :
赞赞
I did successful all 5 steps. Now how I get all the settings done.??? Like on the TV screen. Like record. Play back add to my cell???
赞赞
How to remote access DVR via mobile phone please refer to the steps
1.DVR connect to router via Ethernet cable
2.Enter the Network setting of DVR to set DHCP Enable and DNS set up to Primary DNS: 8.8.8.8 / Secondary DNS :8.8.4.4
3.Check whether DVR connect to Internet success.If the Nat status is Connected mean that DVR connect to Internet success.
4.Phone connect to the Internet, download and install APP XMeye, then open the APP, click Add Device, enter the DVR device code and password.
Note: APP need to register account, if you can not complete the registration, please select the local login mode.
赞赞